|
1 | 1 | # Lesson Plan JavaScript2 Week 1 |
2 | 2 |
|
3 | 3 | ## Agenda |
4 | | -Is this your first lecture for this class? |
5 | | -Please introduce yourself briefly. |
6 | | - - Job |
7 | | - - Education |
8 | | - - City |
9 | | - - Why you love programming (if you do) |
10 | | - |
| 4 | + |
11 | 5 | The purpose of this class is to introduce to the student: |
| 6 | + |
12 | 7 | - How a webpage is made up of objects (DOM) |
13 | 8 | - How JavaScript can be used to manipulate those objects (DOM manipulation) |
14 | | -- Show a list of commonly used browser defined functions |
15 | | -- How to combine add and remove DOM elements |
| 9 | +- Commonly used browser defined functions and properties |
16 | 10 |
|
17 | 11 | ## Core concepts |
18 | 12 |
|
19 | 13 | FIRST HALF (12.00 - 13.30) |
20 | 14 |
|
| 15 | +> Is this your first lecture for this class? |
| 16 | +> Please introduce yourself briefly: |
| 17 | +> |
| 18 | +> - Job |
| 19 | +> - Education |
| 20 | +> - City |
| 21 | +> - Why you love programming (if you do) |
| 22 | +
|
21 | 23 | ## 1. Document Object Model (DOM) |
22 | 24 |
|
23 | 25 | ### Explanation |
24 | | -The [Document Object Model (DOM)](https://developer.mozilla.org/en-US/docs/Web/API/Document_Object_Model/Introduction) is an _object-oriented representation_ of a web page(HTML document) which the web browsers make available to JavaScript for manipulation. Inside a JavaScript file, we can access the DOM through a global object called `document` or `window.document`. |
25 | 26 |
|
26 | | - **It is not a programming language but without it JavaScript would not have any knowledge of our web page/HTML document.** |
| 27 | +The [Document Object Model (DOM)](https://developer.mozilla.org/en-US/docs/Web/API/Document_Object_Model/Introduction) is an _object-oriented representation_ of a web page (HTML document). Every HTML element (ex. `h1`, `p` or `img`) is corrected first and then converted into a JavaScript object by the browser, making it possible for us to use JavaScript to change the contents. Using JavaScript code we can access the `DOM` through a global object called `document` or `window.document`. |
| 28 | + |
27 | 29 | ### Example |
28 | | - ```HTML |
29 | | - <!DOCTYPE html> |
30 | | - <html> |
31 | | - <head> |
32 | | - <title>My title</title> |
33 | | - </head> |
34 | | - |
35 | | - <body> |
36 | | - <h1>My header</h1> |
37 | | - <a href="https://www.w3schools.com/js/pic_htmltree.gif">My link</a> |
38 | | - </body> |
39 | | - </html> |
40 | | - ``` |
41 | | - |
42 | | - 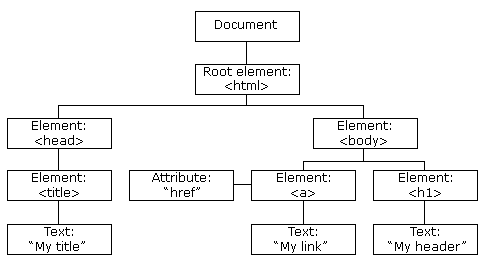 |
| 30 | + |
| 31 | +> Show the student the following HTML in the browser, and then refer to it in the browser console. |
| 32 | +
|
| 33 | +```html |
| 34 | +<!DOCTYPE html> |
| 35 | +<html> |
| 36 | + <head> |
| 37 | + <title>My title</title> |
| 38 | + </head> |
| 39 | + |
| 40 | + <body> |
| 41 | + <h1>My header</h1> |
| 42 | + <p>This is a nice paragraph</p> |
| 43 | + <ul> |
| 44 | + <li>Item 1</li> |
| 45 | + <li>Item 2</li> |
| 46 | + </ul> |
| 47 | + <a href="https://www.w3schools.com/js/pic_htmltree.gif">My link</a> |
| 48 | + </body> |
| 49 | +</html> |
| 50 | +``` |
| 51 | + |
| 52 | + |
| 53 | + |
| 54 | +Notice how the DOM is structured in a tree-like manner. It goes from top (highest) to bottom (lowest) level. It's very much like a family tree: the highest level is the great-great-great-grandparent, while the lowest level is the grand-grand-grand-child. |
| 55 | + |
43 | 56 | ### Exercise |
| 57 | + |
| 58 | +1. Create an HTML file including the structure of a basic webpage (including `!DOCTYPE`, `html`, `head` and `body`, 1 `h1` and 1 `p`) |
| 59 | +2. Find out how to target the `head`, `body` and `h1` elements using the browser console |
| 60 | +3. Present your solution and how you figured it out (_Teacher chooses two people_) |
| 61 | + |
44 | 62 | ### Essence |
45 | 63 |
|
| 64 | +**The DOM is created by the browser: it reads your HTML file and transforms the elements into objects. We use JavaScript to select these elements in order to change them.** |
| 65 | + |
| 66 | +## 2. Commonly used browser defined functions and properties |
46 | 67 |
|
47 | | -## 2. DOM manipulation |
48 | 68 | ### Explanation |
| 69 | + |
| 70 | +As developers we can use code others have written. The browser contains predefined functions that we can use in order to get certain things done. For example, we can add/update/remove new HTML elements to the DOM. The browser also offers us properties, so that we can also play with the user's viewing experience. For example, we can modify the browser's width programmatically so we can offer a responsive website. |
| 71 | + |
49 | 72 | ### Example |
50 | 73 |
|
51 | | -1. Finding DOM elements in HTML page |
52 | | - - `document.getElementById(id)` - Find an element by element id |
53 | | - - `document.getElementsByTagName(name)` - Find elements by tag name |
54 | | - - `document.getElementsByClassName(name)` - Find elements by class name |
55 | | - |
56 | | -2. Adding and Deleting elements in HTML page |
57 | | - - `document.createElement(element)` - Create a new HTML element |
58 | | - - `document.removeChild(element)` - Remove an HTML element |
59 | | - - `document.appendChild(element)` - Add an HTML element |
60 | | - |
61 | | -3. Changing existing HTML elements |
62 | | - - `element.innerHTML` - Change the content/layout of the element |
63 | | - - `element.innerText` - Change just the text of the element |
64 | | - - `element.setAttribute(attribute, value)` - Set/Change attribute of an element |
65 | | - |
66 | | -* Note: `getElementsByTagName` and `getElementsByClassName` returns a list of all matched elements. However, this is not the usual JavaScript array but an HTMLCollection List. A detailed list of APIs available on the DOM can be found [here](https://developer.mozilla.org/en-US/docs/Web/API/Document). |
67 | | -### Exercise |
68 | | -1. Create an HTML form element |
69 | | -2. Create an HTML input(type text) element and set its placeholder as "First Name" |
70 | | -3. Create another HTML input(type text) element and set its placeholder as "Last Name" |
71 | | -4. Add both these elements to the form element |
72 | | -5. Create a button element and add these properties to it: |
| 74 | +```js |
| 75 | +// 1. Print the current page |
| 76 | +window.print(); |
73 | 77 |
|
74 | | - a. Set its text to "Click Me" |
| 78 | +// 2. Get the URL from the address bar |
| 79 | +window.location.href; |
75 | 80 |
|
76 | | - b. Set its id to "button" |
| 81 | +// 3. Make a XHR request to an external service |
| 82 | +window.fetch('https://dog.ceo/api/breeds/image/random'); |
| 83 | +``` |
77 | 84 |
|
78 | | - c. Set its type to "button" |
| 85 | +### Exercise |
| 86 | + |
| 87 | +Find browser functions or properties to show how we can... |
| 88 | + |
| 89 | +1. display an alert box? |
| 90 | +2. find out what the browser's name is? |
| 91 | +3. go back one page? |
79 | 92 |
|
80 | | -6. Add button element to the form |
81 | | -7. Add the form element to main element |
82 | 93 | ### Essence |
83 | 94 |
|
| 95 | +**We can use by the browser predefined functions and properties to shape the user's experience of our application.** |
| 96 | + |
84 | 97 | SECOND HALF (14.00 - 16.00) |
85 | 98 |
|
86 | | -## 3. Show a list of commonly used browser defined functions |
87 | | -### Explanation |
88 | | -### Example |
89 | | -### Exercise |
90 | | -### Essence |
| 99 | +## 3. DOM manipulation |
91 | 100 |
|
92 | | -## 4. How to combine add and remove DOM elements |
93 | 101 | ### Explanation |
| 102 | + |
| 103 | +`DOM manipulation` refers to the act of using JavaScript to select and modify elements within the DOM. We do this in order to provide users interactivity with the page: for example, if a button is clicked the background color changes, or if a menu item is hovered over it becomes bigger. |
| 104 | + |
94 | 105 | ### Example |
| 106 | + |
| 107 | +```html |
| 108 | +<!DOCTYPE html> |
| 109 | +<html> |
| 110 | + <head> |
| 111 | + <title>My title</title> |
| 112 | + </head> |
| 113 | + |
| 114 | + <body> |
| 115 | + <h1>My header</h1> |
| 116 | + <p>This is a nice paragraph</p> |
| 117 | + <ul> |
| 118 | + <li>Item 1</li> |
| 119 | + <li>Item 2</li> |
| 120 | + </ul> |
| 121 | + <button>My button</button> |
| 122 | + <a href="https://www.w3schools.com/js/pic_htmltree.gif">My link</a> |
| 123 | + </body> |
| 124 | +</html> |
| 125 | +``` |
| 126 | + |
| 127 | +```js |
| 128 | +// 1. Make body background color red |
| 129 | +const body = document.body; |
| 130 | +body.style.background = 'red'; |
| 131 | + |
| 132 | +// 2. Change paragraph content |
| 133 | +const p = document.querySelector('p'); |
| 134 | +p.innerHtml = 'This paragraph has changed!'; |
| 135 | + |
| 136 | +// 3. Create and add a new element to an existing HTML element |
| 137 | +const thirdLi = document.createElement('li'); |
| 138 | +const ul = document.querySelector('ul'); |
| 139 | +ul.appendChild(thirdLi); |
| 140 | + |
| 141 | +// 4. On button click alert the user! |
| 142 | +const button = document.querySelector('button'); |
| 143 | +button.addEventListener('click', function() { |
| 144 | + alert('You clicked the button!'); |
| 145 | +}); |
| 146 | +``` |
| 147 | + |
95 | 148 | ### Exercise |
| 149 | + |
| 150 | +Write JavaScript code that... |
| 151 | + |
| 152 | +1. changes the `href` value to `https://www.hackyourfuture.net/` |
| 153 | +2. changes the `button` text to `Make background colored!` |
| 154 | +3. colors the `body` background to your favorite color, when the button is clicked |
| 155 | + |
| 156 | +Present your solution and how you figured it out (_Teacher chooses two people_) |
| 157 | + |
96 | 158 | ### Essence |
| 159 | + |
| 160 | +**Using JavaScript we can select and modify DOM elements. In this way we can provide the user useful interactions with the webpages they're engaged in.** |
0 commit comments