> ## Documentation Index
> Fetch the complete documentation index at: https://trueforge.dev/llms.txt
> Use this file to discover all available pages before exploring further.
# Quickstart
> Run TrueForge, connect a model and tools, and build your first reusable agent — step by step.
## Run TrueForge
TrueForge runs in [two modes](/introduction#two-ways-to-run-it): **local mode** — a single process on your machine, like a personal productivity tool — and **hosted mode** — a shared deployment for your team, with Postgres for storage and Redis for cross-replica peering. The agent features are identical in both.
Requires [Node.js](https://nodejs.org) 22.14 or newer on macOS, Linux, or Windows. One command, no other infrastructure — the UI and backend run locally, and data is stored in a local SQLite file:
```bash theme={null}
npx @truefoundry/trueforge@latest
```
Then open [http://localhost:8790](http://localhost:8790). The defaults work out of the box — see the [FAQ](#faq) to change the port or data location.
Local (standalone) mode is meant for personal use on your own machine. It is not a production or internet-facing
setup — there is no login by default, and data lives in a local SQLite file. Please keep it on localhost. We
cannot take responsibility for data loss or unauthorized access if local mode is used beyond that. For a shared
deployment, use hosted mode below.
Runs the full hosted topology on your machine: the server (UI + API), Postgres, and Redis.
```bash theme={null}
git clone https://github.com/truefoundry/trueforge && cd trueforge
cp packages/trueforge/.env.example packages/trueforge/.env
docker compose up --build
```
Then open [http://localhost:8791](http://localhost:8791).
| Configuration | Default | Description |
| ---------------------------------------------------------------------------------------------------------------------------------------------------------------------------------------------------------------------------------------------------------- | ----------------------- | ---------------------------------------------------------- |
| `POSTGRES_USER` / `POSTGRES_PASSWORD` / `POSTGRES_DB` | from `.env` | Postgres credentials, read from `packages/trueforge/.env`. |
| `PUBLIC_BASE_URL` | `http://localhost:8791` | Public origin, used for MCP OAuth callbacks. |
| Host ports | `8791`, `5433`, `6380` | App, Postgres, and Redis. |
The Helm chart deploys the server in hosted mode with bundled Postgres and Redis (or point it at your own).
Create a Secret for the controller↔server API key, then point `apiKey` at it. The chart ships a
well-known placeholder (`placeholder-value-please-generate-your-own`) — strongly recommended to
replace with a Secret before any shared deploy (the chart does not create one):
```bash theme={null}
kubectl create secret generic trueforge-api-key \
--from-literal=TRUEFORGE_API_KEY="$(openssl rand -hex 32)"
```
```yaml theme={null}
# values.yaml (snippet)
apiKey:
valueFrom:
secretKeyRef:
name: trueforge-api-key
key: TRUEFORGE_API_KEY
```
```bash theme={null}
helm install trueforge oci://tfy.jfrog.io/tfy-helm/trueforge \
--version \
--values values.yaml
```
Find the version you want to install in the [published Helm charts](https://tfy.jfrog.io/ui/packages/oci:%2F%2Ftrueforge).
See the [chart README](https://github.com/truefoundry/trueforge/blob/main/charts/trueforge/README.md#api-key) for full `apiKey` details.
To expose TrueForge through an Istio gateway, save this `VirtualService` in
`values.yaml` under `extraObjects`. Replace the host and gateway with your
own values:
```yaml theme={null}
extraObjects:
- apiVersion: networking.istio.io/v1
kind: VirtualService
metadata:
name: '{{ include "trueforge.fullname" . }}'
spec:
hosts:
- trueforge.example.com
gateways:
- istio-system/public-gateway
http:
- route:
- destination:
host: '{{ include "trueforge.fullname" . }}'
port:
name: http
```
Then install (or upgrade) with the values file that includes both `apiKey` and `extraObjects`:
```bash theme={null}
helm upgrade --install trueforge oci://tfy.jfrog.io/tfy-helm/trueforge \
--version \
--values values.yaml
```
| Value | Default | Description |
| ---------------------- | ------------------ | -------------------------------------------------------------------------------------------------------------------------------------------------------------------------------------------------------------- |
| `apiKey` | placeholder string | Controller↔server key (`TRUEFORGE_API_KEY`). Prefer `valueFrom.secretKeyRef`. |
| `replicaCount` | `1` | Number of server replicas (peered over Redis). |
| `postgresql.enabled` | `true` | Bundle Postgres; set `false` + `externalPostgres.*` to bring your own. |
| `redis.enabled` | `true` | Bundle Redis; set `false` + `externalRedis.url` (string or `valueFrom`). |
| `server.publicBaseUrl` | `""` | Public origin; required for OIDC and MCP OAuth callbacks. |
| `configs.oidc.enabled` | `false` | Enable IdP login via `configs.oidc.*`. Default off = shared local admin — see [chart README](https://github.com/truefoundry/trueforge/blob/main/charts/trueforge/README.md#dev-defaults-read-before-exposing). |
Hosted topology on [Railway](https://railway.com) is defined with [Infrastructure as Code](https://docs.railway.com/infrastructure-as-code) in [`.railway/railway.ts`](https://github.com/truefoundry/trueforge/blob/main/.railway/railway.ts): one project with the server (UI + API), Postgres, and Redis. The app sets `RAILWAY_DOCKERFILE_PATH=Dockerfile.dev` so Railway builds the from-source image ([`Dockerfile.dev`](https://github.com/truefoundry/trueforge/blob/main/Dockerfile.dev)), and wires `DATABASE_URL`, `REDIS_URL`, and `PUBLIC_BASE_URL` in that file.
From a clone of this repo:
```bash theme={null}
pnpm install
railway login
railway init --name trueforge
railway config plan
railway config apply
railway domain
```
`railway config apply` creates the three services and connects them. Generate a public domain on the `trueforge` service (CLI above or Settings → Networking), then open that URL.
Without [OIDC login](/authentication/overview), anyone who can reach the URL is admin. Enable login before sharing
a Railway deployment beyond personal use.
`STANDALONE=false` and `HOST=0.0.0.0` are baked into `Dockerfile.dev`. Railway injects `PORT` automatically.
Local mode (`npx`) uses SQLite and needs no other services. Docker Compose, Kubernetes, and Railway run hosted mode:
Postgres replaces SQLite as durable storage, and Redis peers the replicas so streams and cancellations follow the client
across them.
## Build your first agent
With TrueForge open in your browser, this walkthrough takes you from an empty workspace to a saved, reusable agent. The example builds a **web research briefer** — an agent that searches the web, fans out to parallel subagents, and turns its findings into an interactive one-page brief.
Open **Settings → Models**, find a provider in the catalog, and click **Configure**. Paste your API key in **Configure Provider Details** and click **Create** — the provider's models become available immediately.

 Open **Settings → Connectors** and add a [Model Context Protocol (MCP)](/mcp-servers) server — this is how your agent reaches external tools and data. TrueForge ships a catalog you can connect in one click; each entry shows its auth type (OAuth, an API key, or none), and you can register your own server by URL with **Add MCP Server**.
For this walkthrough, connect **Exa** — a web-search server that needs no authentication. Find it in the catalog and click **Connect**; it moves to **Configured**.
Open **Settings → Connectors** and add a [Model Context Protocol (MCP)](/mcp-servers) server — this is how your agent reaches external tools and data. TrueForge ships a catalog you can connect in one click; each entry shows its auth type (OAuth, an API key, or none), and you can register your own server by URL with **Add MCP Server**.
For this walkthrough, connect **Exa** — a web-search server that needs no authentication. Find it in the catalog and click **Connect**; it moves to **Configured**.
 Open **Settings → Skills**. A [skill](/skills) is a git-backed `SKILL.md` instruction pack the agent loads on demand. Enable one from the built-in list, or click **Import from GitHub** to add a skill from any public repository.
For this walkthrough, enable **web-artifacts-builder** from the built-in list — it lets the agent turn its findings into a self-contained, interactive web page. Click **Enable**; it moves to **Enabled**.
Open **Settings → Skills**. A [skill](/skills) is a git-backed `SKILL.md` instruction pack the agent loads on demand. Enable one from the built-in list, or click **Import from GitHub** to add a skill from any public repository.
For this walkthrough, enable **web-artifacts-builder** from the built-in list — it lets the agent turn its findings into a self-contained, interactive web page. Click **Enable**; it moves to **Enabled**.
 A [sandbox](/sandbox) lets the agent run code, work with files, and use skills — so it's required for the skill you just enabled. TrueForge supports [Daytona](https://www.daytona.io) today. It's a one-time setup:
1. **Create a Daytona API key** with permission to write and delete snapshots and write sandboxes.
2. Open **Settings → Sandbox providers**, choose **Daytona**, click **Configure**, paste your API key, and click **Save**.
A [sandbox](/sandbox) lets the agent run code, work with files, and use skills — so it's required for the skill you just enabled. TrueForge supports [Daytona](https://www.daytona.io) today. It's a one-time setup:
1. **Create a Daytona API key** with permission to write and delete snapshots and write sandboxes.
2. Open **Settings → Sandbox providers**, choose **Daytona**, click **Configure**, paste your API key, and click **Save**.

 See the [Sandbox guide](/sandbox) for provider setup details.
Back in the chat, assemble the agent for this conversation. Pick a model from the selector in the composer, then open the **Tools** menu and set three things:
* **Connectors** — enable **Exa**.
* **Skills** — enable **web-artifacts-builder**.
* **Capabilities** — leave **Dynamic sub-agents** on (it's the default). This lets the agent research each item in parallel instead of one at a time.
See the [Sandbox guide](/sandbox) for provider setup details.
Back in the chat, assemble the agent for this conversation. Pick a model from the selector in the composer, then open the **Tools** menu and set three things:
* **Connectors** — enable **Exa**.
* **Skills** — enable **web-artifacts-builder**.
* **Capabilities** — leave **Dynamic sub-agents** on (it's the default). This lets the agent research each item in parallel instead of one at a time.


 Then send your first message. For example:
```text wrap theme={null}
Research the current state of open-source vector databases. Compare Qdrant, Weaviate, and Milvus on performance, features, and licensing, then write a one-page brief with sources.
```
The agent searches with Exa, delegates each database to a parallel subagent, and uses **web-artifacts-builder** in the sandbox to render an interactive brief.
Then send your first message. For example:
```text wrap theme={null}
Research the current state of open-source vector databases. Compare Qdrant, Weaviate, and Milvus on performance, features, and licensing, then write a one-page brief with sources.
```
The agent searches with Exa, delegates each database to a parallel subagent, and uses **web-artifacts-builder** in the sandbox to render an interactive brief.
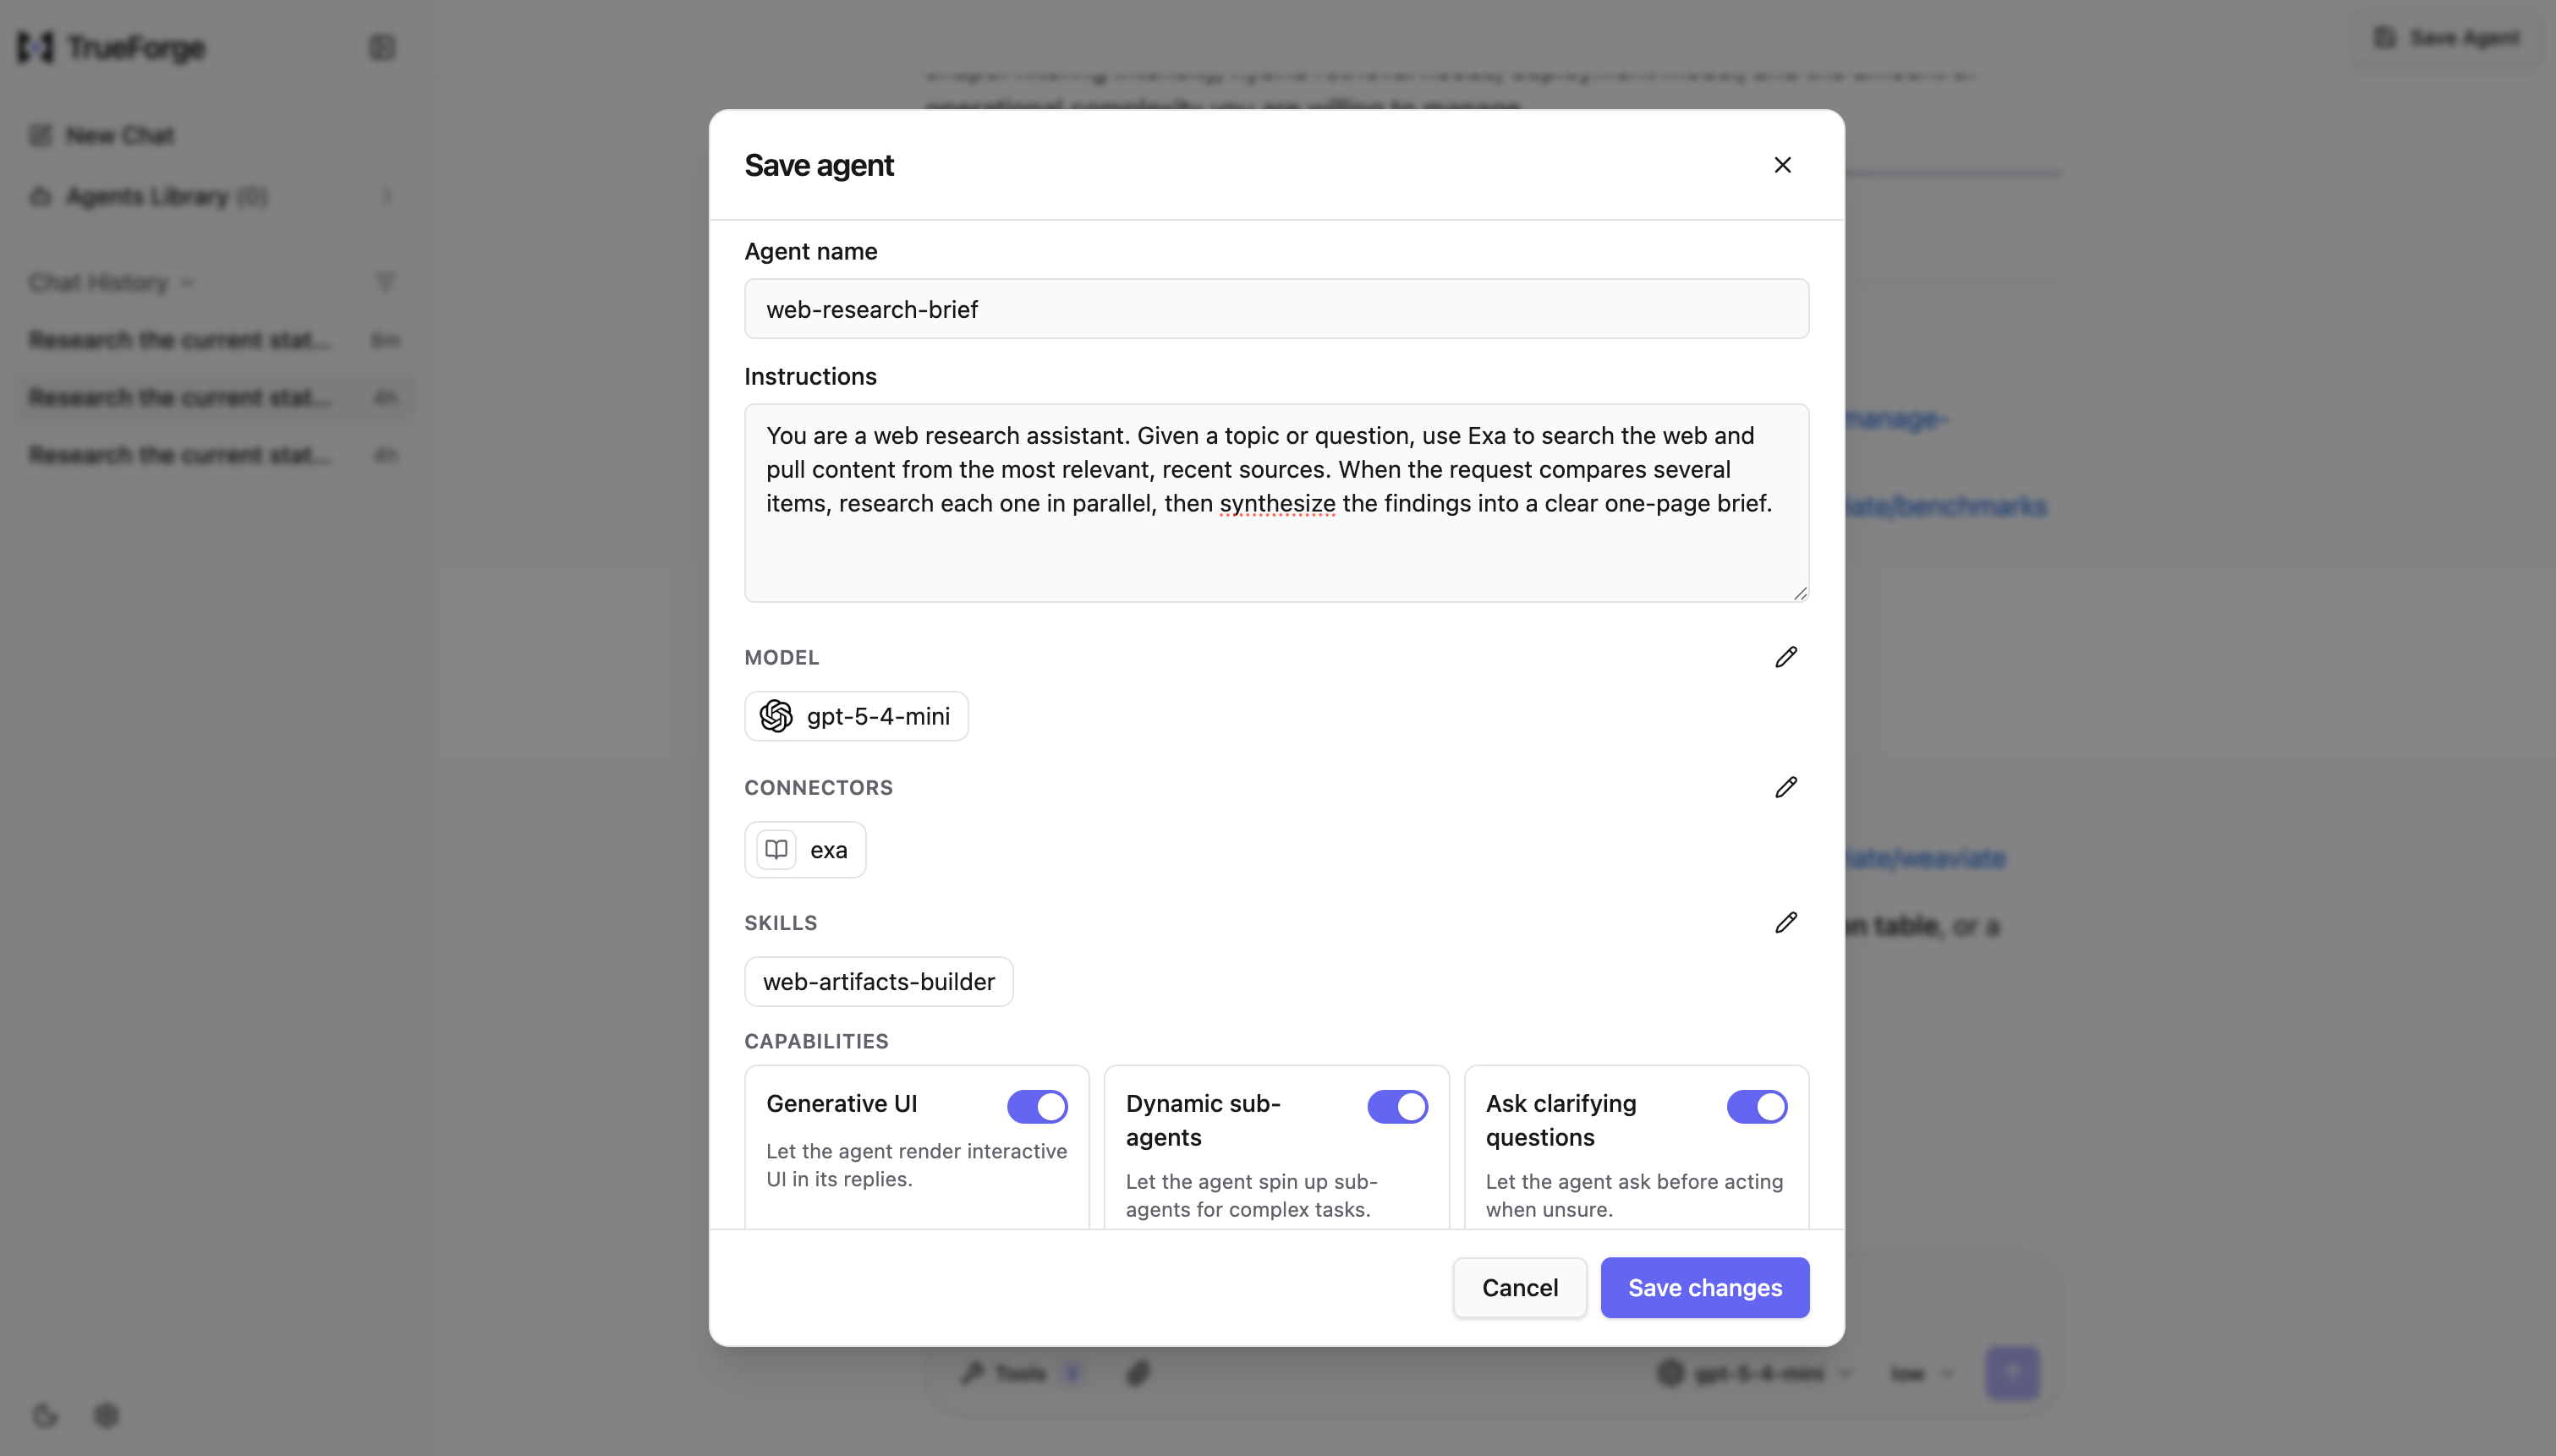
 Happy with the setup? Click **Save Agent**, then in **Save agent** give it a name and instructions and click **Save changes** — this captures the model, connectors, skills, and prompt together as a reusable agent. For this example:
* **Name** — `web-research-brief`
* **Instructions** —
```text wrap theme={null}
You are a web research assistant. Given a topic or question, use Exa to search the web and pull content from the most relevant, recent sources. When the request compares several items, research each one in parallel, then synthesize the findings into a clear one-page brief.
```
Happy with the setup? Click **Save Agent**, then in **Save agent** give it a name and instructions and click **Save changes** — this captures the model, connectors, skills, and prompt together as a reusable agent. For this example:
* **Name** — `web-research-brief`
* **Instructions** —
```text wrap theme={null}
You are a web research assistant. Given a topic or question, use Exa to search the web and pull content from the most relevant, recent sources. When the request compares several items, research each one in parallel, then synthesize the findings into a clear one-page brief.
```
 Open **Agents** from the sidebar. Your saved agent is there — click **Try** to start a fresh chat with the same setup, or **Edit** to tweak it. See [Agents](/agent-library) for shared-visibility notes in hosted mode.
 ## FAQ
Pass `--port`, or set the `PORT` environment variable:
```bash theme={null}
npx @truefoundry/trueforge --port 3000
# or
PORT=3000 npx @truefoundry/trueforge
```
In hosted mode, change the host port mappings in `docker-compose.yml` instead.
In a SQLite file in your OS's application data directory. To put it somewhere else, set the `SQLITE_PATH` environment variable:
```bash theme={null}
SQLITE_PATH=~/trueforge/db.sqlite npx @truefoundry/trueforge
```
The public origin the server hands to MCP servers for OAuth callbacks. It defaults to `http://localhost:`, which is correct as long as you access TrueForge from the same machine.
Set it when the server is reachable at a different address — behind a domain, reverse proxy, or on another host:
```bash theme={null}
PUBLIC_BASE_URL=https://trueforge.myorg.com npx @truefoundry/trueforge
```
In hosted mode, set it in `packages/trueforge/.env` (Docker Compose), via `server.publicBaseUrl` (Helm), or as
`PUBLIC_BASE_URL=https://${{RAILWAY_PUBLIC_DOMAIN}}` on Railway.
## Next steps
Models, MCP servers, skills, sandbox — and how catalogs work.
Select resources and configure approvals, questions, and Generative UI.
Subagents, deferred tools, code mode, compaction, and more.
Sessions, turns, events, and the agent spec.
## FAQ
Pass `--port`, or set the `PORT` environment variable:
```bash theme={null}
npx @truefoundry/trueforge --port 3000
# or
PORT=3000 npx @truefoundry/trueforge
```
In hosted mode, change the host port mappings in `docker-compose.yml` instead.
In a SQLite file in your OS's application data directory. To put it somewhere else, set the `SQLITE_PATH` environment variable:
```bash theme={null}
SQLITE_PATH=~/trueforge/db.sqlite npx @truefoundry/trueforge
```
The public origin the server hands to MCP servers for OAuth callbacks. It defaults to `http://localhost:`, which is correct as long as you access TrueForge from the same machine.
Set it when the server is reachable at a different address — behind a domain, reverse proxy, or on another host:
```bash theme={null}
PUBLIC_BASE_URL=https://trueforge.myorg.com npx @truefoundry/trueforge
```
In hosted mode, set it in `packages/trueforge/.env` (Docker Compose), via `server.publicBaseUrl` (Helm), or as
`PUBLIC_BASE_URL=https://${{RAILWAY_PUBLIC_DOMAIN}}` on Railway.
## Next steps
Models, MCP servers, skills, sandbox — and how catalogs work.
Select resources and configure approvals, questions, and Generative UI.
Subagents, deferred tools, code mode, compaction, and more.
Sessions, turns, events, and the agent spec.